Hardware/Raspberry Pi 3B+: Unterschied zwischen den Versionen
(Link zur Konfiguration) |
(Rearrange) |
||
| (10 dazwischenliegende Versionen desselben Benutzers werden nicht angezeigt) | |||
| Zeile 2: | Zeile 2: | ||
|name=Raspberry Pi 3B+ | |name=Raspberry Pi 3B+ | ||
|manufacturer=Raspberry Pi Foundation | |manufacturer=Raspberry Pi Foundation | ||
|Picture=Raspberry_Pi_3_B+.png | |||
|deprecated=Nein | |deprecated=Nein | ||
|outdoor=Nein | |outdoor=Nein | ||
| Zeile 15: | Zeile 16: | ||
|mimostreams=1x1 | |mimostreams=1x1 | ||
|antennaconnector=U.FL | |antennaconnector=U.FL | ||
|firmware=Raspbian, OpenWRT | |||
|flashmethod=TFTP-Client, BOOTP, Speicherkarte | |flashmethod=TFTP-Client, BOOTP, Speicherkarte | ||
|flashguide=https://www.raspberrypi.org/documentation/hardware/raspberrypi/bootmodes/net_tutorial.md | |flashguide=https://www.raspberrypi.org/documentation/hardware/raspberrypi/bootmodes/net_tutorial.md | ||
| Zeile 21: | Zeile 23: | ||
}} | }} | ||
Konfiguration wie | Als einzelnes Gerät kann ein Raspberry Pi direkt an einer Antenne, z.B. [[Hardware/NanoBeam_M5-400|PowerBeam M5-400]] im WDS Bridge-Modus nach [[Firmware/airOS|Anleitung]] betrieben werden. | ||
Alternativ kann auch ein normaler PC so konfiguriert werden um "im Feld" einfach zu testen. | |||
Konfiguration unter Raspbian: | |||
Initiales Setup: | |||
apt update && apt upgrade | |||
apt install olsrd olsrd-plugins bridge-utils vlan | |||
raspi-config # Enable UART and SSH | |||
Bei Distributionen mit /etc/network/interfaces | |||
auto eth0 | |||
iface eth0 inet static | |||
auto br-ff | |||
iface br-ff inet static | |||
bridge_fd 0 | |||
bridge_maxwait 0 | |||
bridge_waitport 0 | |||
bridge_stp no | |||
bridge_ports eth0 | |||
address 193.238.15z.zzz | |||
netmask 255.255.255.255 | |||
# Die Bridge soll allen Traffic annehmen. | |||
post-up ip link set dev br-ff promisc on | |||
auto br-ff.1100 | |||
iface br-ff.1100 inet static | |||
address 10.0.0.2 | |||
netmask 255.255.255.0 | |||
Bei Distributionen ohne /etc/network/interfaces (wie [https://voidlinux.org/ Void Linux]) in die /etc/rc.local | |||
ip a add <FUNKFEUER-IP>/32 dev eth0 | |||
ip link set dev eth0 up | |||
ip link add link eth0 name eth0.1100 type vlan id 1100 | |||
ip a add 10.xx.yy.101/24 dev eth0.1100 | |||
ip l set dev eth0.1100 up | |||
Anschließend | |||
service networking restart | |||
systemctl disable dhcpcd.service | |||
vi /etc/default/olsrd # YES | |||
vi /etc/olsrd/olsrd.conf # siehe [[OpenVPN_mit_Debian/Ubuntu]] ohne OpenVPN | |||
PoE für den Pi ist nur mit einem zusätzlichen Aufsteck-Board möglich: [https://www.raspberrypi.org/products/poe-hat/ PoE HAT] | |||
Nachdem der Raspberry Pi selbst ein WLAN-Interface hat könnte man ihn auch mit hostapd zum Router machen. | |||
Aktuelle Version vom 7. Oktober 2018, 16:39 Uhr
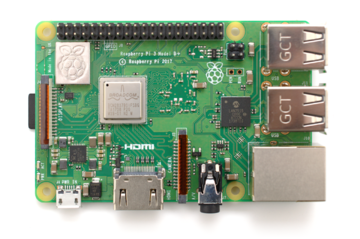
| Raspberry Pi Foundation Raspberry Pi 3B+ | |
|---|---|

| |
| Name |
Raspberry Pi 3B+ |
| Hersteller |
Raspberry Pi Foundation |
| Veraltet |
Nein |
| Outdoor |
Nein |
| Antenne |
Nein |
| System | |
| CPU |
BCM2837B0, Cortex-A53 (ARMv8) 64-bit SoC @ 1.4GHz |
| RAM |
1GB |
| Flash |
SD-Karte |
| PoE |
802.3af |
| Netzwerk | |
| LAN-Ports |
1 |
| Switch |
Nein |
| WLAN |
Ja |
| WLAN Band |
2.4 GHz, 5 GHz |
| WLAN Standard |
802.11gn |
| MIMO Streams |
1x1 |
| Antennenanschluss |
U.FL |
| Firmware | |
| Firmware |
Raspbian, OpenWRT |
| Flashmethode |
TFTP-Client, BOOTP, Speicherkarte |
| Flashanleitung |
https://www.raspberrypi.org/documentation/hardware/raspberrypi/bootmodes/net_tutorial.md |
| Konfiguration | |
Als einzelnes Gerät kann ein Raspberry Pi direkt an einer Antenne, z.B. PowerBeam M5-400 im WDS Bridge-Modus nach Anleitung betrieben werden.
Alternativ kann auch ein normaler PC so konfiguriert werden um "im Feld" einfach zu testen.
Konfiguration unter Raspbian: Initiales Setup:
apt update && apt upgrade
apt install olsrd olsrd-plugins bridge-utils vlan
raspi-config # Enable UART and SSH
Bei Distributionen mit /etc/network/interfaces
auto eth0
iface eth0 inet static
auto br-ff
iface br-ff inet static
   bridge_fd 0
   bridge_maxwait 0
   bridge_waitport 0
   bridge_stp no
   bridge_ports eth0
   address 193.238.15z.zzz
   netmask 255.255.255.255
# Die Bridge soll allen Traffic annehmen.
   post-up ip link set dev br-ff promisc on
auto br-ff.1100
iface br-ff.1100 inet static
address 10.0.0.2
netmask 255.255.255.0
Bei Distributionen ohne /etc/network/interfaces (wie Void Linux) in die /etc/rc.local
ip a add <FUNKFEUER-IP>/32 dev eth0
ip link set dev eth0 up
ip link add link eth0 name eth0.1100 type vlan id 1100
ip a add 10.xx.yy.101/24 dev eth0.1100
ip l set dev eth0.1100 up
Anschließend
service networking restart
systemctl disable dhcpcd.service
vi /etc/default/olsrd # YES
vi /etc/olsrd/olsrd.conf  # siehe OpenVPN_mit_Debian/Ubuntu ohne OpenVPN
PoE für den Pi ist nur mit einem zusätzlichen Aufsteck-Board möglich: PoE HAT Nachdem der Raspberry Pi selbst ein WLAN-Interface hat könnte man ihn auch mit hostapd zum Router machen.